Monday, July 22, 2013

Android ဖုန္း ၀ယ္ မယ္႕ သူမ်ား အ၀ယ္မ မွားရေအာင္ ဖတ္ၿဖစ္ေအာင္ ဖတ္ၾကပါ

Android ဖုန္း ၀ယ္ မည္႔ သူမ်ား အ၀ယ္ မမွား ရေအာင္ Mobile House မွ မန္ဘာ မ်ား အတြက္ Mobile House Admin ကိုရဲရင္႔ေအာင္ မွ ေရးေပး လိုက္ ပါတယ္ ။
ဖုန္း တစ္ လံုး ၀ယ္ ၿပီး အနည္း ဆံုး ၆လ က ေန ၁ ႏွစ္ ၂ ႏွစ္ ထိ သံုး ၾကပါတယ္ ။ အဲ႔ ေတာ႔ ၀ယ္ၿပီး တဲ႔ အခ်ိန္ မွဟိုဟာ မရ ၊ ဒီဟာ မရ ၊ စက္က ေလး ၊ ဟန္း ၊ နဲ႔ စိတ္ညစ္ ရတာ ေတြ မ်ား ပါတယ္ ။ အဲ႔ ေတာ႔ ကိုယ္ေပး တဲ႔ ေစ်း နဲ႔ ရသင္႕ သေလာက္ မရ တာမ်ိဳး ေတြ ၾကံဳေန ၾကရပါတယ္ ။
အေၾကာင္းတစ္ခုခု ေၾကာင္႔ ဖုန္း ပ်က္ ခဲ႔ ၿပီ ဆိုလွ်င္ ၿပင္ ဖို႔ အတြက္ လဲ ၾကိဳ မစဥ္းစား ပဲ ၀ယ္ ၾကတာေၾကာင္႔ ပ်က္ တဲ႔ ခ်ိန္ၾက မွ ၿပင္မရ လို႔ ဒုကၡ ေရာက္ ၾကတဲ႔ သူေတြ လဲ မနည္း ပါဘူး ။
အဲ႔ ေတာ႔ Android ဖုန္း တစ္လံုး ၀ယ္မည္ ဆို ရင္ ဘာေတြ ၾကည္႔ သင္႔ လဲ ??

1. CPU speed
Brand မ်ားၿဖစ္ တဲ႔ Sony , Samsung , HTC ,Huawei ,LG ,Moto စတာ ေတြ က ေတာ႔ အခ်ိဳ႕ ဆိုင္ေတြ မွာ ေမး ႏိုင္ပါတယ္ ။ဆိုင္တိုင္း ေတာ႔ မသိၾကဘူူး ေပါ႔ ဗ်ာ ။ အဲ႔ ေတာ႔ ကိုယ္ ၀ယ္ ဖို႕ ဆံုးၿဖစ္ ၿပီး ရင္
Brand ထဲ က ဆို ရင္ ဆိုင္ မသြားခင္ အရင္ ေအာက္ကေပးထားတဲ႔ လင္႔ မွာ ၀င္ ေရာက္ ၿပီး မိမိ ဖုန္း ရဲ႕ အေသးစိတ္ အခ်က္ လက္ ေတြ နဲ႔ CPU speed ကို ေလ႔ လာႏိုင္ပါတယ္ ။
အနိမ္႔ ဆံုး ၀ယ္ယူ သင္႔ သည္႔ CPU speed က ေတာ႔ 800 ၿဖစ္ပါတယ္ ။ မ်ားေလ ေကာင္းေလ ပဲ ေပါ႔ ။
CPU speed 800ေအာက္ နည္း လွ်င္ ဂိမ္း မ်ား ေဆာ႔ မရၿခင္း၊ ထစ္ၿခင္း မ်ား ။ဖုန္း သံုး လွ်င္ ေလးၿခင္း ၊ဟန္း ၿခင္း မ်ား ၿဖစ္ ပါတယ္ ။ တရုတ္ဖုန္း မ်ား မွာ ေတာ႔ application တစ္ခု သြင္းၿပီး မွ ၾကည္႕ ရႈ ႏိုင္မည္ ၿဖစ္ သည္ ။ဆိုင္ ေတြ က တရုတ္ဖုန္း ေတာ႔ မသိတာ မ်ားပါတယ္ ။တကယ္ လို႔ ၾကိဳက္ၿပီ ၀ယ္မယ္ ေသခ်ာ ၿပီ ဆိုလွ်င္ CPU speed ေမးပါ မသိ လွ်င္  ဒီေဆာ႔၀္ သြင္းၿပီး စစ္ ၾကည္႕ လိုက္ပါ ။ မ်ားေသာ အားၿဖင္႔ ေစ်း နည္း လွ်င္ CPU speed နည္းတက္ပါတယ္ ။တရုတ္ ဖုန္း ေတြ ကေတာ႔ တခ်ိဳ႕ ဟာ က ဟန္ၿပ ပဲ  ပါတာေတြ ရွိပါတယ္ ။ ဘယ္ဖုန္း ၿဖစ္ၿဖစ္ သံုးတာၾကာ လွ်င္ ေတာ႔ CPU speed က် လာပါတယ္ ။ Brand နဲ႔ တရုတ္ ဖုန္း မွာ ကြာ တာက ေတာ႔ China ဖုန္း ေတြ က ၆လ ေလာက္ အတြင္း မွ CPU speed က် သြားပါတယ္ ။
ဥပမာ -၀ယ္ ခ်ိန္က ၈၀၀ ဆိုပါေတာ႔ ၆ လ အတြင္း 670 ,560 စသၿဖင္႔ က် သြားတက္ ပါတယ္ ။

2. Internal storage
Internal storage က လဲ Android ဖုန္း တစ္လံုး အတြက္ အရမ္း ေရးပါပါတယ္ ။ အမ်ား စု က မန္မိုရီ 8Gb ပါတယ္ တို႔ ၊ sd card 8Gb ဆိုဒ္ လို႔ ရတယ္ ဆို တာ နဲ႔ လံုေလာက္ ၿပီ မွတ္ေန ၾကပါတယ္ ။
တကယ္ က Internal storage ႏွင္႔Phone stoage or Memory storage ႏွင္႔ sd card storage ဆို ၿပီး ၃ မ်ိဴးပါတက္ပါတယ္ ။မ်ားေသာ အားၿဖင္႔ Internal storage ႏွင္႔ sd card storage ႏွစ္မ်ိဳး ေတာ႔ ပါပါတယ္ ။
အဓိက စစ္ရမွာ က internal storage ပါ ။ တၿခား ဟာ ေတြ က အေရး မၾကီး ပါဘူး ။
Game ေတြ သြင္း ရင္ sd storage  ထဲ သြင္းသြင္း Phone stoage or Memory storage ထဲ  သြင္းသြင္း Internal ထဲ မွာ ေတာ႔ run ဖို႔ အတြက္  ၃ပံု ပံု ၁ ပံု ေလာက္ ေတာ႔ ေနရာ ယူပါတယ္ ။
ဥပမာ - 3Mb game တစ္ခု ဆိုပါ ေတာ႔ sd ထဲကို သြင္း တယ္ သို႔ ေပ မဲ႔ Internal storage ထဲ မွာ 1 Mb Run ေန တာ ကို ေတြ႕ ရပါမယ္ ။

Internal storage စစ္ေဆး နည္း
2.3.x version ေတြ မွာ
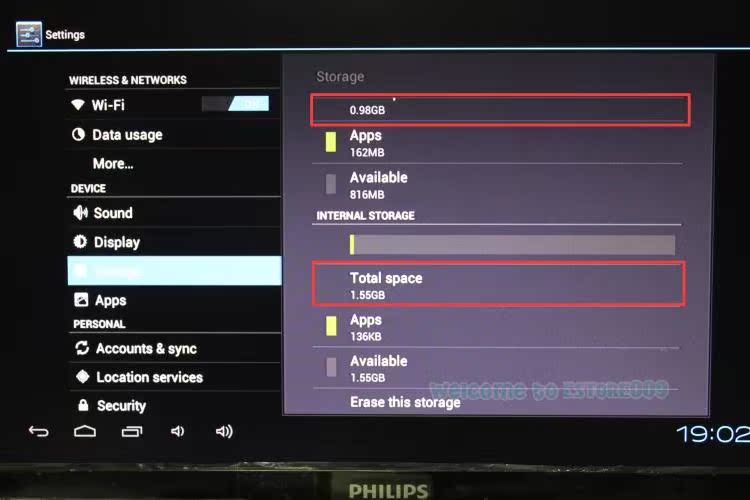
settings - SD card and Phone storage သို႔ Phone storage သို႔ storage ထဲ၀င္ပါ ။ အထဲ မွာ sd card ႏွင္႔ Internal Phone Storage ဆို တာပါပါတယ္ ။Internal storage ဆို တာကို ၾကည္႕ ရမွာပါ ။ Available Space ကို ၾကည္႕ ပါ ။သို႕ Total Space ကို ၾကည္႕ ပါ ။ဖုန္း အသစ္မွာ ေတာ႕ Available Space ကို ၾကည္႕ လိုက္ပါ ။
 
 4.0.x , 4.1 , 4.1.2 version ေတြ မွာ
 settings - storage ထဲ၀င္ပါ ။ အထဲ မွာ sd card ႏွင္႔ Internal Phone Storage နဲ႔ အခ်ိဳ႕ ဖုန္း ေတြ မွာ Phone storage or Memory Storage ဆိုပါပါတယ္ ။Internal storage ဆို တာကို ၾကည္႕ ရမွာပါ ။ Available Space ကို ၾကည္႕ ပါ ။သို႕ Total Space ကို ၾကည္႕ ပါ ။ဖုန္း အသစ္မွာ ေတာ႕ Available Space ကို ၾကည္႕ လိုက္ပါ ။

3. ေစ်းႏႈန္း
ေစ်း က ေတာ႔ မ်ားလား နည္း လား ဆိုတာ ထက္ မိမိ ၀ယ္ယူ မည္႔ ဆိုင္ က service ဘယ္ေလာက္ၿပန္ ေပး ႏိုင္လဲ ၾကည္႕ ပါ ။ ဥပမာ - ၁ ႏွစ္ အာမခံ မရေတာင္ ၃ ရက္အာမခံ ေတာ႔ ေပး ရပါမယ္ ။ ၃ ရက္ အတြင္း ခ်ိဳ႕ ယြင္းခ်က္ တစ္ခုခု ေတြ႔ ရင္ၿပန္လည္ လဲလွယ္ ႏိုင္ ေစ ရန္ အတြက္ ပါ။ ကၽႊန္ေတာ္ တို႔ လဲ အာမခံ ၁ ႏွစ္ မေပး ပါဘူး ။ဘာလို႔ လဲ ဆိုေတာ႔ ကၽႊန္ေတာ္ တို႔ ရတဲ႔ အၿမတ္က တစ္လံုး မွ ၂ ေထာင္ ၃ ေထာင္ ၿမတ္ တာၿဖစ္ တဲ႔ အတြက္ အာမခံ ေပးဖို႔ ဆို တာ မလြယ္ ပါဘူး ။ ယခု ဆိုင္ အမ်ား စု ေပး ေနတဲ႔ အာမခံ ဆို တာ ၾကံဳ ဖူးသူ တိုင္း သိပါတယ္ ။နည္းနည္း ပါးပါး ေလာက္ ပ်က္တာ ေလာက္ ပဲ တာ၀န္ ယူပါတယ္ ။က်န္ တာ က User false ပါ ပဲ ။ အဲ႔ ေတာ႔ အာမခံ ေပးသည္ ၿဖစ္ ေစ မေပး သည္ၿဖစ္ ေစ ၃ ရက္ ေတာ႔ အာမခံ ေတာင္း ပါ ။ ၿပီးေတာ႔ မိမိ ၀ယ္ မည္႕ ဖုန္း က ဥပမာ samsung galaxy Y ဆိုပါေတာ႔ 90000 ေလာက္ေပး ရတဲ႔ ခ်ိန္မွာ ရတဲ႔ ဖန္ရွင္ ေတြ ။ ကင္မရာ 3 Mag , internal storage 512 , cpu 800 စသၿဖင္႔ ေပါ႔ တၿခား ဖုန္း နဲ႔ ႏိႈင္း ယွဥ္ ၾကည္႕ ပါ ။ ဥပမာ huawei မွာ 90000 ၀န္း က်င္ မွာ ကင္မရာ 5 Mag ရခ်င္ရမယ္ , internal 1Gb ရရင္ရမယ္ ,cpu ၁၀၀၀ ၿဖစ္ခ်င္ ၿဖစ္မယ္ ။ အဲ႔ လို မ်ိဳး ခ်ိန္ၾကည္႕ ပါ ။ၿပီး မွ ႏွစ္သက္ ရာ ကို ၀ယ္ယူ ပါ ။

4. ၿပဳၿပင္ လို႔ ရမရ
ဒါ လဲ အေရး ပါပါတယ္ ။ဖုန္း ကိုင္ ၿပီ ဆို မွ ေတာ႔ ပ်က္ မွာ ပါပဲ ။ ပ်က္ ရင္ ၿပင္ မရ ရင္ ဘာ လုပ္ မလဲ 3,4 ေသာင္းတန္ က ထား ၿပင္ လဲ မတန္ ဘူး ။ ၁ သိန္း ေက်ာ္ ေတြ ဆို   ေတာ႔  ၂၀၀၀၀ ေလာက္ ထိ ၿပင္ လို႔ သင္႔ ေသးပါတယ္ ။အဲ႔ ေတာ႔ ၿပင္ ဖို႔ အတြက္ အပိုပစၥည္းလာမလာ ၊ ေဆာ႔၀္ ပိုင္း ဆို လဲ ေရးရမရ စ တာ ေတြ ကို ဆိုင္ မွ မ၀ယ္ ခင္ ေမး ပါ ။အခ်ိဳ႕ ဆိုင္ ေတြ က ေရာင္းရၿပီး ေရာ မလိမ္႔ တပတ္ ေၿပာတက္ပါတယ္ ။ဒီမွာ ရလား မရ ရင္ ေကာ ဆို ၿပီးေသခ်ာ ေမးပါ ။၅ေသာင္း ေအာက္ ၀ယ္ မယ္ ဆို ရင္ ေတာ႔ ၁၀၀၀၀ ေအာက္ ပ်က္ တာ ေလာက္ ပဲ ၿပင္သင္႔ တဲ႔ အတြက္ အပို ပစၥည္း မလာလဲ ကိစၥ မရွိပါဘူး ။ Touch ၿဖစ္ၿဖစ္ LCD ၿဖစ္ၿဖစ္ တရုတ္ Android ဖုန္း က လာ ရင္ ၁၅၀၀၀ ႏွင္႔ အထက္ ေစ်း ရွိပါတယ္ ။

5. အေထြေထြ
အေထြေထြ ဆိုတာ ကေတာ႔ Wifi ,bluetooth , 3G internet , လိုင္းေကာင္းမေကာင္း စသၿဖင္႔ ေပါ႔ ။ ဒါ ေတြက ေတာ႔  သိပ္ေတာ႔ အေရး မပါပါဘူး ။ စစ္ ခ်င္ ရင္ ေတာ႔ စစ္ ၾကည္႕ ပါ ။
ကဲ Android ဖုန္း သံုး မည္႔ Mobile House မန္ဘာ မ်ား ၊ မိတ္ေဆြ မ်ား ဒါ ေလး ေတြ ကို စစ္ေဆး ၿပီး ၀ယ္ ယူသင္႔ ပါတယ္ ။

phone bill မကုန္ေအာင္ အင္တာနက္ free သံုးမယ္

 
ဒီနည္းေလးးကေတာ့  ဆိုက္တဆိုက္ကေနေတြ႕လို႕ က်ေနာ္ျပန္ရွယ္ေပးလိုက္တာပါ...။အသံုး၀င္မယ္လို႕ လည္း ထင္ပါတယ္..။က်ေနာ္ကိုယ္တိုင္က အင္တာနက္ကို free သံုးေနတာဆိုေတာ့ သူငယ္ခ်င္းမ်ား ကိုလည္း ရေစခ်င္ပါတယ္.....။ဒီနည္းေလးကိုေရးသားတဲ့ ကိုေနလင္းျဖိဳး ကိုလည္း အထူးပဲ ေက်းဇူးတင္ပါ တယ္ဗ်ာ...။ဖုန္းနဲ႕ ကြန္ျပဴတာ ကို ခ်ိတ္ျပီးသံုးတဲ့ သူေတြ အတြက္ တကယ္ေကာင္းတဲ့ နည္းေလးပဲဗ်ာ..။

 ကဲ အားလုံးပဲ ဒီတစ္ခါေတာ့ Facebook ထဲကကြ်န္ေတာ္ေဘာ္ဒါတစ္ေယာက္ဆီကေန ပုိက္ဆံမကုန္တဲ့ အင္တာနက္ဖုန္းသုံးနည္းကုိ ေဖာ္ျပလုိက္ပါတယ္။ သိထားရမွာက နည္းလမ္းေတြကုိရွာေဖြရတာဟာ အိပ္ေရးပ်က္ခံ၊ အပင္ပန္းခံျပီးရွာရတာမုိ႔ တစ္ခုခုျဖစ္ခဲ့ရင္ အျပစ္မဆုိၾကဖုိ႔ ၾကိဳတင္ျပီး သတိေပးခ်င္ပါတယ္။ ဒီပုိ႔စ္မွာ မူရင္းပုိ႔စ္ပုိင္ရွင္ ကုိယ္တုိင္စမ္းသပ္ေဖာ္ျပထားတဲ့နည္း၊ သူအသုံးျပဳခဲ့တဲ့ Device ေတြနဲ႕ဆုိရင္ေတာ့ အဆင္ေျပမွာပါ။ အျခား Device ေတြကုိလည္း ကြ်န္ေတာ္အေနနဲ႔ မစမ္းသပ္ႏုိင္လုိ႔ နားလည္ေပးေစခ်င္ပါတယ္။ ေအာက္ကပုိ႔စ္ေတြဟာ မူရင္းပုိ႔စ္ပုိင္ရွင္ရဲ႕ စာသားအတုိင္းပဲျဖစ္ပါတယ္။ စာလုံးေပါင္းသတ္ပုံေတြကုိ ျပင္ဆင္ေပးတာက လြဲလုိ႔ေပါ့။ :D

1. 3G အင္တာနက္ဖြင့္ထားေသာ Sim Card (မွတ္ခ်က္...GSM လဲရပါတယ္)
2. ကိုယ္ရဲ့ဖုန္းလံုျခံုးေရအတြက္ စိုးရိမ္တယ္ဆိုရင္ IMEI ကို Fake လုပ္ထားရပါမယ္
(ဒါကေတာ့ လိုအပ္ခ်က္မဟုတ္ပါဘူး ကြ်န္ေတာ္ကေတာ့ မလုပ္ဘူးေအးေရာ India ကဆိုရင္ေတာ့လိုမယ္)
3. လုပ္နည္းကေတာ့ APN setting ခ်ိန္းတာပါ ေအာက္မွာေဖာ္ျပထားပါတယ္။
(မွတ္ခ်က္ ကြ်န္ေတာ္ကေတာ့ Samsung Galaxy Ace (GT-S5830i) andriod version 2.3.6 Root လုပ္ထားပါတယ္။ အဲဒီ Device စမ္းသပ္ထားတာျဖစ္လုိ႔
Galaxy APN ခ်ိန္းနည္းအတိုင္းတင္ျပပါမယ္) Kali Linux-Gnome (32bit) ပါ ဖုန္းကေန USB Tethering လုပ္လိုက္တာနဲ့ auto ခ်ိတ္ပါတယ္။ ဘာမွလုပ္ေပးစရာမလိုပါဘူး တကယ္လို အဲလိုမရဘူးဆိုရင္ Backtrack Myanmar Group ကိုသြားျပီးေမးျကည့္ပါ။

Setting >>>Wireless and networks>>>Mobile networks>>>Acess Point Names
ကိုအဆင့္ဆင့္သြားပါ ျပီးရင္ Menu key ကိုနိွပ္ျပီး New APN ကိုေရြးပါ ျပီးရင္
  • ---Name ေနရာမွာ 3G free (any) Type 1 WAP လုိ႔ျဖည့္လိုက္ပါ
  • ---APN ေနရာမွာ wapwest.cellone.in လုိ႔ေရးေပးပါ
  • ---Proxy ေနရာမွာ 110.100.3.2 လုိ႔ေရးပါ
  • ---Port ေနရာမွာ 9209 လုိ႔ရးပါ
  • ---User name ေနရာမွာ ppp လုိ႔ထည့္ပါ
  • ---Password ေနရာမွာ ppp123 လုိ႔ေရးပါ
  • ---Server ေနရာမွာ 110.100.3.2:9209 လုိ႔ထည့္ပါ
  • ---MCC ေတာ့ 414 ပါပဲ
  • ---MNC ေတာ့ 01 ပါ
  • ---Authentication type မွာ CHAP ကိုေရြးပါ
  • ---APN type မွာ Internet ကိုေရြးပါ

ျပီးရင္ Save လုပ္ျပီး ခုလုပ္ထားတဲ့ APN ကို ON ခဲ့ပါ။

ျပီးရင္ အင္တာနက္ကို On လိုက္ပါ သိုမဟုတ္ Use packet data ကို အမွန္ျခစ္လိုက္ပါ
ဟုတ္ကဲ့ အင္တာနက္ မရေသးပါဘူး ရေအာင္လုပ္ရပါအံုးမယ္။
ဘယ္လိုလုပ္ရမလဲဆိုေတာ့ Kali Linux OS တင္ထားတဲ့ computer မွာ usb tethering ကို on လိုက္ရပါမယ္။ အင္တာနက္တက္ျပီးဆိုတာနဲ့ *124# ကို ဖုန္းက Check လုပ္လိုက္ပါ။
တတ္နုိင္ရင္ ဖုန္းထဲက background data တို႔ sync တို႔ကို ပိတ္ထားလိုက္ပါ ျပီးရင္သံုးလို႔ ရပါျပီ။

*_အေရးျကီးဆံုးတစ္ခုက ကြန္ပ်ုတာမပိတ္မီွ သုိ႔မဟုတ္ tethering ကိုမျဖုတ္မွီ ဖုန္းကအင္တာနက္ကို အရင္ ပိတ္ရပါမည္။ ဒီလိုမွမဟုတ္ရင္ပိုက္ပိုက္ျဖတ္ပါတယ္_*

MPT က မပိတ္သေရြ႕ေတာ့ရေနပါလိမ့္မယ္။ ပိတ္သြားရင္ တားတားလဲမတတ္နိုင္ပု ဟိဟိ။

ျဖည့္စြက္ခ်က္ ။ လိုအပ္ခ်က္ တစ္ခုရိွသြားတယ္ဗ် kali မွာသံုးမွ မျဖတ္တာ က်န္တာေတြမွာျဖတ္တယ္ေနာ္ ျပီးေတာ့ ကြန္ပ်ဴတာမပိတ္ခင္ အင္တာနက္အရင္ပိတ္ရတယ္။ မေန႔က kali OS (Gnome) နဲ႕ သံုးတာ မျဖတ္လို႔ ဒီေန႔ backtrakနဲ႕သံုးေတာ့ ျဖတ္သြားတယ္ မေက်နပ္လို့ kali နဲ႕ ျပန္သံုးတာ မျဖတ္ဘူး kali ကိုနဲ့အဆက္သြယ္မျဖတ္ခင္ အင္တာနက္ကိုအရင္ပိတ္ဖို့မေမ့နဲ႕အံုးဗ်။

Screenshot:

Sunday, July 21, 2013

Online ေပၚမွာ ဓါတ္ပံုေလးေတြကို ကိုယ္တိုင္စိတ္ၾကိဳက္ဖန္တီးရေအာင္

ဒီပို႕စ္ေလးက  download လုပ္စရာမလိုဘဲ online ေပၚမွာဘဲမိမိစိတ္ၾကိဳက္ပံုေလးကိုဖန္တီးဖို႕အတြက္ပါ
ဒီပုိ႕စ္ေလးကိုသိထားတဲ့သူငယ္ခ်င္းမ်ားရွိသလို မသိေသးတဲ့ သူငယ္ခ်င္းမ်ားအတြက္ပါ
ကိုယ္ခ်စ္တဲ့သူငယ္ခ်င္း  ခ်စ္သူ ဒါမွမဟုတ္ မိမိပံုေလးေတြကိုလည္း စိတ္ၾကိဳက္ဖန္တီးလိုက္ရေအာင္ေနာ္
http://www.photofunny.net/cat-love
ကို သြားလိုက္ေနာ္...အရင္ဆံုး ကိုယ္ဖန္တီးခ်င္တဲ့ ဒီဇုိင္းကိုအရင္ေရြးပါ ျပီးရင္ေအာက္မွာ ပံုနဲ႕ရွင္းျပထားပါတယ္
http://alinkabar.ning.com/profiles/blog/show?id=6320079%3ABlogPost%3A1233477&xgs=1&xg_source=msg_share_post

Windows အတက္ျမန္ေစရန္ မသုံးတဲ့ Program ေတြကို ဖယ္ထုတ္ရေအာင္...


Start >> Run
-       ''msconfig'' လို႔ရိုက္ပါ။
-       System Configuration Utility'' Box ေပၚလာပါမယ္။
-       ညာဘက္အစြန္းဆံုးမွာ ''Start up Tab'' ဆိုတာရွိပါတယ္။
-       ကိုယ့္အတြက္ အသံုးမ၀င္တဲ့ Program ေတြရဲ႕ေရွ႕မွာ အမွန္ျခစ္ အမွတ္အသားလုပ္ထားခဲ့ရင္ ျပန္ၿပီး ''uncheck'' လုပ္ေပးပါ။
-       Restart ျပဳလုပ္ေပးလုိက္ပါ။
Posted by dingnoeizolen On 2:19 PM
http://pcoptimiserblog.com/wp-content/uploads/2011/05/Internet-Optimizer.jpg


အခုဟာကေတာ့ Internet ေနွေနရင္ေတာ့ ျမန္ေအာင္ Speed ခုိးတဲ့ Software ေလးပါ
ကုိယ္ Computer ဟာအရမ္း Computer ေနွေနရင္ေတာ့ ဒီ Software ေလးနဲ့ ေတြလုိက္ရင္ေတာ့
ေနွေနရင္လည္မရေတာ့ ဘူး Internet အရမ္းေနွေနတဲ့ သူေတြေတာ့ ဒီ Software ေလးသုံးေစ
ျခင္တယ္ မင္းတုိ့ Internet ေလးျမန္သြားမွာပါ။

ဒီမွာေဒါင္းေစျခင္တယ္


ေဒါင္ျပီးေတာ့ Run ေနာ္။


ဒီလာကေတာ့ စာေတြသုိမဟုတ္ပုံေတြလိုလုိ ေရးရတဲစာေလးေတြပါ Facebook, Twitter တုိမွာ
စာလုံးေလးေတြလွလွပပေရးျခင္တဲ့ သူေတြေတာ့ အရမ္းကုိအဆင္ေျပမွျဖင့္ပါတယ္ Symbols
အေနနဲေရးရတဲ့စာေလးေတြပါ ေအာက္မွာ Demo ေလးေတြၾကည္ၾကပါအုံး။

အမ်ားၾကီးရွိပါေသးတယ္ကုိယ့္ဟာကုိဘဲစမ္းၾကည္ေတာ့

❤♡❥♥♣♠❀✿❄♫♬♪⚢⚣⚤♁☯

➷➳➴➵➶➺➹➼➲➽✩★

✵✡✧☆✸✺✱✽✪✹

အေပါအဟာက အစမ္းေရတာပါ။


ဒီမွာေရပါ Here


http://www.pop4us.com/new_production/2011024820USB.Disk.Security%206.1.0.432.jpg
USB Disk Security ေလးပါဒီဟာကေတာ့ ကုိယ့္ Computer မွာ USB သုံးတဲ့အခါ USB ကနဲ့ဝင္
လာတဲ့ Virus ကုိယ္ကာကြာေပးတဲ့ Software ေလးပါ Vision ကေတာ့ပုံမွာျပ ထားတဲ့အတုိပါဘဲ
ဒီ Software ေလးဟာ Computer ေတာ္ေတာ္မ်ားမ်ားသုံးၾကတယ္ေလ ဘာျဖစ္လုိလဲဆုိရင္ေတာ့
USB ကဝင္လာတဲ့ Virus ကာကြယ္ျခင္လုိေဘာ့။


USB ထဲကအပုိ File ေတြကုိလဲ Clean ေပးလုိရတယ္ ရွိသားသူေတြေတာ့ အလွဘဲၾကည္ထား
လုိက္ မရွိေသးတဲ့သူေဒါင္းေတာ့ USB ကနဲ Virus မဝင္နိူေအာင္ ကာကြယ္ၾကစုိ့

USB Disk Security ကုိေဒါင္းရန္


ဒီ Link ကုိသြားျပီးရင္ ခဏေစာင္ပါ သူအလုိနဲလာပါလိမ္မည္။

အသံုးဝင္ ဝင္းဒုိး ေရွာ့ကတ္ကီး တစ္ရာ


တစ္ရာမကပါဘူး။ ဝဘ္ဆုိဒ္တစ္ခုက တင္ေပးထားတာ ေတြ႔လို႔ ထပ္ဆင့္ ရွဲ လိုက္ပါတယ္။ Microsoft Windows OS ေတြမွာ အသံုးျပဳလို႔ရမယ့္ Key မ်ား ျဖစ္ပါတယ္။
Keyboard Shortcuts (Microsoft Windows)
1. CTRL+C (Copy)
2. CTRL+X (Cut)
3. CTRL+V (Paste)


4. CTRL+Z (Undo)
5. DELETE (Delete)

6. SHIFT+DELETE (Delete the selected item permanently without placing the item in the Recycle Bin)

7. CTRL while dragging an item (Copy the selected item)

8. CTRL+SHIFT while dragging an item (Create a shortcut to the selected item)

9. F2 key (Rename the selected item)

10. CTRL+RIGHT ARROW (Move the insertion point to the beginning of the next word)

11. CTRL+LEFT ARROW (Move the insertion point to the beginning of the previous word)

12. CTRL+DOWN ARROW (Move the insertion point to the beginning of the next paragraph)

13. CTRL+UP ARROW (Move the insertion point to the beginning of the previous paragraph)

14. CTRL+SHIFT with any of the arrow keys (Highlight a block of text)
SHIFT with any of the arrow keys (Select more than one item in a window or on the desktop, or select text in a document)

15. CTRL+A (Select all)

16. F3 key (Search for a file or a folder)

17. ALT+ENTER (View the properties for the selected item)

18. ALT+F4 (Close the active item, or quit the active program)

19. ALT+ENTER (Display the properties of the selected object)

20. ALT+SPACEBAR (Open the shortcut menu for the active window)

21. CTRL+F4 (Close the active document in programs that enable you to have multiple documents opensimultaneously)

22. ALT+TAB (Switch between the open items)
23. ALT+ESC (Cycle through items in the order that they had been opened)

24. F6 key (Cycle through the screen elements in a window or on the desktop)

25. F4 key (Display the Address bar list in My Computer or Windows Explorer)

26. SHIFT+F10 (Display the shortcut menu for the selected item)
27. ALT+SPACEBAR (Display the System menu for the active window)

28. CTRL+ESC (Display the Start menu)

29. ALT+Underlined letter in a menu name (Display the corresponding menu) Underlined letter in a command name on an open menu (Perform the corresponding command)

30. F10 key (Activate the menu bar in the active program)

31. RIGHT ARROW (Open the next menu to the right, or open a submenu)

32. LEFT ARROW (Open the next menu to the left, or close a submenu)

33. F5 key (Update the active window)

34. BACKSPACE (View the folder onelevel up in My Computer or Windows Explorer)

35. ESC (Cancel the current task)

36. SHIFT when you insert a CD-ROMinto the CD-ROM drive (Prevent the CD-ROM from automatically playing)
Dialog Box - Keyboard Shortcuts

1. CTRL+TAB (Move forward through the tabs)

2. CTRL+SHIFT+TAB (Move backward through the tabs)

3. TAB (Move forward through the options)

4. SHIFT+TAB (Move backward through the options)

5. ALT+Underlined letter (Perform the corresponding command or select the corresponding option)

6. ENTER (Perform the command for the active option or button)

7. SPACEBAR (Select or clear the check box if the active option is a check box)

8. Arrow keys (Select a button if the active option is a group of option buttons)

9. F1 key (Display Help)
10. F4 key (Display the items in the active list)
11. BACKSPACE (Open a folder one level up if a folder is selected in the Save As or Open dialog box)

Microsoft Natural Keyboard Shortcuts

1. Windows Logo (Display or hide the Start menu)

2. Windows Logo+BREAK (Display the System Properties dialog box)

3. Windows Logo+D (Display the desktop)

4. Windows Logo+M (Minimize all of the windows)

5. Windows Logo+SHIFT+M (Restorethe minimized windows)

6. Windows Logo+E (Open My Computer)

7. Windows Logo+F (Search for a file or a folder)

8. CTRL+Windows Logo+F (Search for computers)
9. Windows Logo+F1 (Display Windows Help)

10. Windows Logo+ L (Lock the keyboard)
11. Windows Logo+R (Open the Run dialog box)

12. Windows Logo+U (Open Utility Manager)
13. Accessibility Keyboard Shortcuts

14. Right SHIFT for eight seconds (Switch FilterKeys either on or off)

15. Left ALT+left SHIFT+PRINT SCREEN (Switch High Contrast either on or off)

16. Left ALT+left SHIFT+NUM LOCK (Switch the MouseKeys either on or off)

17. SHIFT five times (Switch the StickyKeys either on or off)

18. NUM LOCK for five seconds (Switch the ToggleKeys either on or off)

19. Windows Logo +U (Open Utility Manager)
20. Windows Explorer Keyboard Shortcuts

21. END (Display the bottom of the active window)
22. HOME (Display the top of the active window)

23. NUM LOCK+Asterisk sign (*) (Display all of the subfolders that are under the selected folder)

24. NUM LOCK+Plus sign (+) (Display the contents of the selected folder)

25. NUM LOCK+Minus sign (-) (Collapse the selected folder)

26. LEFT ARROW (Collapse the current selection if it is expanded, or select the parent folder)

27. RIGHT ARROW (Display the current selection if it is collapsed, or select the first subfolder)

Shortcut Keys for Character Map

After you double-click a character on the grid of characters, you can move through the grid by using the keyboard shortcuts:

1. RIGHT ARROW (Move to the rightor to the beginning of the next line)

2. LEFT ARROW (Move to the left orto the end of the previous line)
3. UP ARROW (Move up one row)

4. DOWN ARROW (Move down one row)
5. PAGE UP (Move up one screen at a time)

6. PAGE DOWN (Move down one screen at a time)
7. HOME (Move to the beginning of the line)

8. END (Move to the end of the line)
9. CTRL+HOME (Move to the first character)

10. CTRL+END (Move to the last character)

11. SPACEBAR (Switch between Enlarged and Normal mode when a character is selected)

Microsoft Management Console (MMC)
Main Window Keyboard Shortcuts

1. CTRL+O (Open a saved console)
2. CTRL+N (Open a new console)

3. CTRL+S (Save the open console)
4. CTRL+M (Add or remove a console item)

5. CTRL+W (Open a new window)

6. F5 key (Update the content of all console windows)
7. ALT+SPACEBAR (Display the MMC window menu)

8. ALT+F4 (Close the console)

9. ALT+A (Display the Action menu)
10. ALT+V (Display the View menu)

11. ALT+F (Display the File menu)
12. ALT+O (Display the Favorites menu)

MMC Console Window Keyboard Shortcuts

1. CTRL+P (Print the current page or active pane)

2. ALT+Minus sign (-) (Display the window menu for the active console window)

3. SHIFT+F10 (Display the Action shortcut menu for the selected item)

4. F1 key (Open the Help topic, if any, for the selected item)
5. F5 key (Update the content of all console windows)

6. CTRL+F10 (Maximize the active console window)
7. CTRL+F5 (Restore the active console window)

8. ALT+ENTER (Display the Properties dialog box, if any, for theselected item)

9. F2 key (Rename the selected item)

10. CTRL+F4 (Close the active console window. When a console has only one console window, this shortcut closes the console)
Remote Desktop Connection Navigation

1. CTRL+ALT+END (Open the Microsoft Windows NT Security dialog box)

2. ALT+PAGE UP (Switch between programs from left to right)

3. ALT+PAGE DOWN (Switch between programs from right to left)
4. ALT+INSERT (Cycle through the programs in most recently used order)

5. ALT+HOME (Display the Start menu)

6. CTRL+ALT+BREAK (Switch the client computer between a window and a full screen)

7. ALT+DELETE (Display the Windows menu)

8. CTRL+ALT+Minus sign (-) (Place a snapshot of the active window in the client on the Terminal server clipboard and provide the same functionality as pressing PRINT SCREEN on a local computer.)

9. CTRL+ALT+Plus sign (+) (Place asnapshot of the entire client window area on the Terminal server clipboardand provide the same functionality aspressing ALT+PRINT SCREEN on a local computer.)

Microsoft Internet Explorer Keyboard Shortcuts

1. CTRL+B (Open the Organize Favorites dialog box)
2. CTRL+E (Open the Search bar)
3. CTRL+F (Start the Find utility)
4. CTRL+H (Open the History bar)
5. CTRL+I (Open the Favorites bar)
6. CTRL+L (Open the Open dialog box)
7. CTRL+N (Start another instance of the browser with the same Web address)
8. CTRL+O (Open the Open dialog box,the same as CTRL+L)
9. CTRL+P (Open the Print dialog box)
10. CTRL+R (Update the current Web page)
11. CTRL+W (Close the current window)
.
Ref:computertrick
Aung Kham (TSJ team)

Oxford Dictionary of English T 4.3.059 ( Android Application )

Dictionary ကို အလြယ္တကူအသံုးျပဳခ်င္ၾကတဲ့ သူငယ္ခ်င္းေတြအတြက္ပါ။ Oxford Dictionary ေလးပါ။ စာအုပ္ေတြ၊ computer ေတြနဲ႕လည္း အသံုးျပဳျပီးသားျဖစ္ၾကတဲ့ အတြက္ ေထြေထြထူးထူးေတာ့ ရွင္းျပစရာမလိုေတာ့ဘူးလို႔ထင္ပါတယ္ဗ်ာ။  ဒီ app ေလးကို ကိုယ့္ဖုန္းထဲကို install လုပ္ၿပီး အသံုးျပဳရံုပါပဲဗ်ာ။ အသံထြက္ပါ ပါ၀င္တဲ့အတြက္ အသံုး၀င္မယ္လို႔ထင္ပါတယ္။ Android version 2.2 နဲ႕အထက္မွာ အသံုးျပဳႏိုင္ပါတယ္ဗ်ာ။


ေအာက္က link ကေန download လုပ္ႏိုင္ပါၿပီဗ်ာ။

NoBloat (Android ဖုန္းေတြထဲက မလိုအပ္တဲ႔ System App ေတြ ဖ်က္ခ်င္ရင္)


 ဖုန္းထဲမွာ မူလကတည္းကပါရွိတဲ့ ဖ်က္မရ ေရႊ႕မရတဲ႔ App ေတြကို ဖ်က္ေပးႏိုင္တဲ႔ Software ေလးပါ...။  Root လုပ္ထားတဲ႔ Devices ေတြမွာသာ အသံုးျပဳႏုိင္ပါတယ္။
ဖ်က္မရ ေရႊ႕မရတဲ႔  System App ေတြကို ဒီ NoBloat နဲ႔ ဖ်က္ပစ္ႏိုင္သလို Disabling and Enabling  လုပ္ႏိုင္ပါတယ္...။ 
 ျပီးေတာ့ ဘယ္ System App ကို ဖ်က္ဖ်က္ မဖ်က္ခင္မွာ SD Card ထဲကို Backup လုပ္ေပးထားပါတယ္။ အဲ့ဒီအတြက္ မွားဖ်က္မိခဲ့ရင္ေတာင္ အလြယ္တကူ ျပန္ၿပီး Restore လုပ္ႏိုင္မွာပါ။   Android 2.2 ႏွင့္အထက္ ဖုန္းမ်ားမွာ အသံုးျပဳႏိုင္ပါတယ္။


ROOT REQUIRED.
NoBloat lets you delete unwanted apps that come pre-installed with your phone. Simply select the bloatware that you want to get rid of and click delete. By default, NoBloat will automatically place backups on your external storage which you can restore at any time.
Remember, though: ALWAYS have a backup of your phone. Important features might break when deleting system apps.Using the blacklist in the full version, you can swiftly get rid of all bloatware after installing a new ROM. When wiping your phone's data, you can export your blacklist to import it on your new ROM.
You're advised to try the free version before buying. Not all ROMs allow NoBloat to work.
Free version features
* Disabling and enabling system apps
* Creating backups of system apps and restoring them
* Deleting system apps
Full version features
* Creating a blacklist of system app to delete
* Batch operation to backup/remove all blacklisted system apps
* Batch operation to enable all disabled system apps
* Batch operation to restore all backups
* Export your settings and blacklist to external storage to import them later
* Quickly find apps using the search functionality
Notes
* If you have issues uninstalling apps, try uninstalling the app's updates or enabling USB debugging.
* In order to use NoBloat you need root access. If you do not know what root access means, you probably don't have it.
* Be aware that in order to update your version of Android, you might need all original apps in place. It is advised to always have a backup of deleted apps or to just disable them so you can restore them later.
Disclaimer
* TVK Development cannot be held responsible for any damage you may cause.
* Removing critical apps can cause your phone to malfunction. Be sure to ONLY delete apps you know for certain aren't needed.
* Always have backups of your device's image.
* If you have any questions regarding the safety of actions using NoBloat, you're advised to contact TVK Development beforehand.

If you have any other suggestions, questions or issues, feel free to contact me and I'll do my best to respond asap. Please don't use reviews for complaints as I will be unable to respond to your issue.


Click Here to Download

မန္ဘာ၀င္ခ်င္းျဖစ္အားေပးပါ